
For years and years, I have wanted to try to make a croquembouche (a fancy, French term for a cream puff tower), but I always talked myself out of it, saying that they were just too big to make, and no reason special enough to go through the effort of making one.
Well, this year, I decided that I wasn't going to talk myself out of it anymore! I was, however, going to scale it way back, and do a very small tower, so that I wouldn't be wasting anything.
This croquembouche wasn't difficult, and really, when you think about what all it is made of, it is more time consuming than anything else. With a little know-how, you can easily put together a tower that will be sure to impress everyone!Well, this year, I decided that I wasn't going to talk myself out of it anymore! I was, however, going to scale it way back, and do a very small tower, so that I wouldn't be wasting anything.
There are three separate steps/recipes involved here, so this will likely be a rather lengthy post, but, around the holiday season, I'm happy to step things up a bit!
For years, I have used Martha Stewart's recipe for pastry cream, so that's what I'm going to use today, and while it has never given me any problems, I didn't let mine cook long enough this year. It still turned out okay, just a little more runny than I would usually like. I'm chalking this up as a trial run before making eclairs for Christmas morning!

Here's your grocery list for this one:
For the cream puffs:
For the cream puffs:
1 stick of unsalted butter
1 tsp sugar
1 tsp sugar
1/2 tsp salt
1 1/4 C All purpose flour
1 C of water
4 large eggs, plus 1 egg white if needed
For the pastry cream:
2 C whole milk
1/2 C sugar
Pinch of salt
4 large egg yolks
1/4 C cornstarch
2 TBS unslated butter, cut into small pieces
2 tsp vanilla extract (or 1/2 vanilla bean, scraped out)
3/4 C heavy whipping cream
For the spun sugar:
2 C granulated sugar
2 C granulated sugar
1/2 C water
1/2 C light corn syrup
To start off with, I usually make my pastry cream; mainly because this can be done a couple of days ahead. If you're as busy as I am (and, honestly, aren't we all?) this time of the year, anything that can be done ahead of time is always appreciated. The pastry cream is very, very similar to an ice cream base, so if you're familiar with making ice cream, or have tried making my sweet potato casserole ice cream, caramel ice cream, or brown sugar peach ice cream, then you'll have no problems making this. If you've never made ice cream, but make this, then you'll have no problems whipping up any ice cream you want! Let's get started!
To start off with, put your milk into a medium size sauce pan, along with 1/4 c of sugar, and a pinch of salt; if you're using a vanilla bean, put the seeds in, and the bean, also. Cook over medium heat until it comes up to a bare simmer; you'll see bubbles begin to form around the edges of the pan.


While you're waiting for that to come up to a simmer, put your egg yolks, cornstarch and remaining 1/4 C of sugar into a mixing bowl, giving it a good whisk until combined. I like to lightly beat my egg yolks by themselves first, just to give them a bit of a head start, but that's optional.


Now that the milk has started to barely simmer, pour it very slowly into your eggs (if you've used a vanilla bean, be sure to remove the bean before pouring it out), whisking constantly, so that the egg yolks don't scramble. I like to pour it so slowly, that it runs down the side of the bowl, rather than pouring directly into the egg yolks.


I whisk on high, to keep things moving pretty quickly, and to cut down on the chance I end up with scrambled eggs. The only down side to this, is that it makes the mixture pretty foamy, but, to me, that's not that big of a problem. Once the entire milk mixture has been incorporated with the eggs, pour everything through a fine wire colander, to catch any eggs that may have been scrambled, to help break up the foam.


I had a little bit to catch, but that's what it's there for! To make sure that your pastry cream is nice and smooth!


Cook this again, over medium heat, until it thickens, about 2 minutes, stirring constantly, to make sure that this custard doesn't burn or scorch on the bottom. This is where I made a mistake; I didn't let my custard thicken up enough. This would have been perfect if I were making an ice cream base, but if I had let this thicken up for another minute, this would have been perfect! It just takes a little bit of practice to figure everything out. Once your custard has thickened, move it back into the mixing bowl.


Add in the 2 TBS of unsalted butter, that has been cut into small cubes, and mix on medium speed, for about 5 minutes, to make sure the butter has been incorporated and the mixture slightly cools, then add in the 2 tsp of vanilla extract, if you're not using the vanilla bean.


After that, move the custard to a bowl or plastic container, and cover with plastic wrap, making sure you press the wrap down directly on top of the custard, to prevent a skin from forming. This will hold in the fridge for up to 2 days.

Now that that is finished, lets turn our attention to the cream puffs! This recipe is for a pate a choux (pronounced pat-a-shoe) dough, which is a special dough that, when baked, bakes up hallow, for all kinds of pastry cream fillings. This is perfect for eclairs, cream puffs, and things of that nature. Again, it is a French term, but this honestly could not be easier to pull together.
To start off with, put in 1 stick of butter, that has been cut up into small cubes, along with the sugar, salt, and 1 C of water into a medium saucepan. Bring to a boil over medium high heat, until the butter has just melted, and remove from the heat. Quickly stir in all of the flour, and put the pot back over medium high heat, cooking, stirring constantly, until the mixture pulls away from the sides. Depending on what kind of pan you use, you may see a skin forming on the bottom of the pan, which is fine; this should take about 3 minutes.


I used a nonstick pan, so the skin didn't form on the bottom of my pan, but this dough is ready for the next step!

Move your dough to a mixing bowl, and mix on low speed until slightly cooled, about 1 minute or so. Increase the speed to medium, and add the eggs, one at a time, mixing until each egg has been incorporated before adding the next one. After all of your eggs have been added, you should have a slightly sticky dough. You'll know your dough is correct, when you can touch a bit between two fingers, and a small soft peak forms. If this doesn't happen, add a beaten egg white, adding a little bit at a time, until this does happen for you. I've been making this dough for years, and have only needed an egg white once, but it is good to know about it, if you need it.


The sizes of the puffs you pipe out, are up to you. I wanted some some-what small puffs, so I piped out circles that were about 1" in diameter, give or take, onto a baking sheet lined with parchment paper. You'll see that they have peaks on the top. Just dip your finger in a bit of water, and smooth the tops down.


Once they are all smoothed down, I baked them in a preheated 375* oven, for 25 minutes. If you want a more golden brown pastry, bake them for another few minutes! Move them immediately to cooling racks.


While they're still warm, poke holes with a wooden skewer, so that the steam can escape, and so that filling these will be easier. Let these cool completely.

While you're waiting for these to cool, let's finish the pastry cream. Take 3/4 C of heavy whipping cream and put it into a mixing bowl, fitted with a whisk attachment. Whip this until stiff peaks form, then fold in the pastry cream custard that we made earlier.


This whipped cream is coming along, these are soft peaks...see how the peak kind of flops over? Back in it goes for another minute or so!


That's better! Move your freshly whipped cream to a bowl, and put your pastry cream custard into the mixing bowl, and gently stir the custard around to soften. Gently, on low speed, add in the whipped cream, and mix until just combined. It won't hurt anything if the custard is a little streaky.


All combined! Like I said, I didn't let my initial custard thicken up enough, so my finished pastry cream was really thin and creamy. I wasn't happy about this, but what are you gonna do? I just put it in a pastry bag, fitted with a small piping tip, and poured the pastry cream into the waiting puffs. It was a little messy, but everything worked out fine.


Now then, you can call this a day, and have filled cream puffs! However, like I said, I always wanted to try my hand at making a croquembouche, or a tower of cream puffs! So I decided to move ahead for the final step. Making spun sugar. This, as usual, is much easier than it seems. However, because this sugar gets up to 300*, and you're going to be slinging it around, you have to be very, very careful.
To start off with, put the sugar, water, and corn syrup in a medium saucepan, and cook over low heat, until the sugar has melted.


Once the sugar has melted, move the heat up to medium, and let this mixture cook, without stirring, until it comes up to 305*, or the hard crack stage.


Since I'm doing a small tower, I'm not going to need much spun sugar to go around the outside of this. Because of this, I set up my spun sugar area in my (freshly cleaned) sink. As you can see, I laid some parchment paper on the bottom of the sink, with two wooden spoons going across the top. I'll go into more of that later.
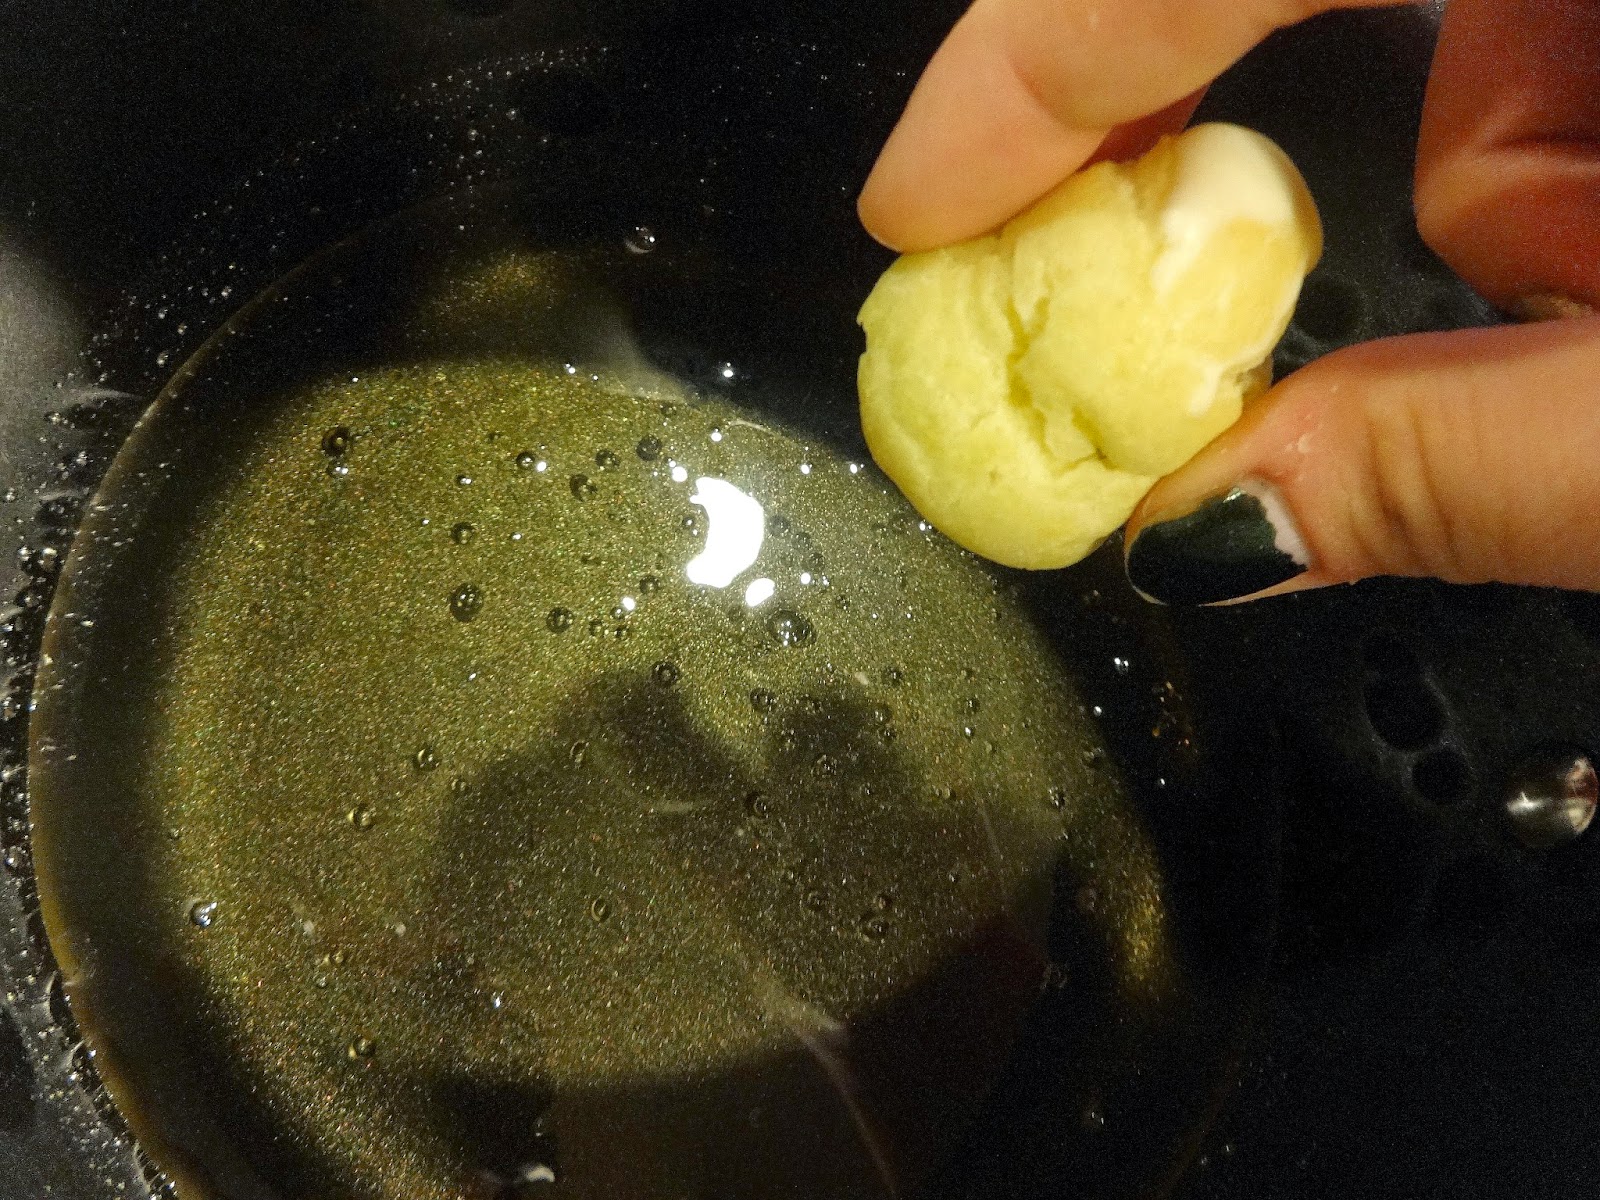
We have now reached 305* on my candy thermometer, so this gets removed from the heat, and the bottoms of each cream puff gets very carefully dipped into the sugar/caramel, then placed in a circle on a plate. This is going to be the glue that holds the tower together.


Carefully build your tower, one puff at a time; they do have croquembouche forms (you can either buy them, or make your own; just search YouTube...lots of video how-to's), that you can easily build around, but I just free formed mine. If I were doing this for an occasion, or a party, I would definitely use a form, so that it looks a little more structured.


After dipping all of your cream puffs in, your sugar will have cooled off just enough to become stringy. This is the perfect time to work on making spun sugar! Take a fork, dip it into the hot caramel, and from a couple of feet above the spoon handles, drizzle back and forth quickly. The caramel will fall into fine strings, that you can gather off of the spoons, and working quickly, wrap around your tower. If you let it set too much on the spoons, the strands will crack, instead of wrap around.
I didn't work crazy fast, you have a few minutes, so there's no need to break your neck trying to rush with this process, but you can't walk away for ten minutes, either.


You will want to wait until the last moment before building the tower, and making the spun sugar, as this is very susceptible to humidity. It rained over night here, and the next morning, my tower was just a plate of cream puffs, with a sugar syrup all over it. I knew that was going to happen, so I wasn't upset about it. But, I would have been devastated if I didn't know! Thankfully, the spun sugar and assembly doesn't take long, so you can do it an hour or so ahead of time, and get great results with it!
This spun sugar is a fun technique that you can use on top of cakes, cupcakes, ice cream....anything that you want to look really special! It really is just beautiful!
Also note, if you want a deeper golden color on your caramel, just let it cook another minute or so on the stove. Always remember, though, that the caramel will continue to darken for a bit once you've taken it off of the heat, so if you reach the perfect color on the stove, it may be too dark once you remove it.


No comments:
Post a Comment