
Hello, everyone! Welcome to Thursday! Is it just me or has this week gone by equally slowly and fast? It's weird how that works.
Anyhoo, French macarons have been exploding lately - you can't turn your head without seeing one. Okay, that may be a slight exaggeration, but not by far. My husband and I were out doing some shopping the other day, and not only did we see an adorable kids apron with macarons on them (which, of course, we had to get for our daughter), but I noticed macarons in two other stores, on clothing prints! I guess if you can't make them, you can at least wear them.
But, don't worry about that, because they are surprisingly easy to make!
Every Friday, after I pick up my daughter from school, I take her out to a French cafe, and she gets two macarons while I enjoy a cream puff, and we catch up about her week at school. I love our dates, but wow macarons are expensive! Oh well, its our weekly thing, and we both love it.
I decided that I would surprise her the other day, and ask her if she wanted to help me make some macarons.
She excitedly informed me that she would love to help make "smacarons" - yeah, that was one for the books!
Thankfully, these were easy enough that she was able to do a lot of the work, and I just walked her through it, and I assure you, if a 3 year old can do it, you can too!!
Thankfully, these were easy enough that she was able to do a lot of the work, and I just walked her through it, and I assure you, if a 3 year old can do it, you can too!!

Here's your grocery list for this one;
For the macaron:
1 3/4 C powdered sugar
For the macaron:
1 3/4 C powdered sugar
1 1/4 C almond flour/meal
4 egg whites
1/4 C granulated sugar
Green powdered food coloring*
Peppermint extract
Filling:
4 oz chocolate chips
4 oz chocolate chips
1/4 C heavy cream
That's it! These don't have a lot of ingredients, and the trick, if there is one, is more in the technique while putting them together, than anything else, but we'll go over that in a minute. For now, lets get started with separating the egg whites and setting them aside. I had to do this twice, because the first time I did it, one of the yolks broke, and a little bit got into my whites. If this happens to you, you cannot use the whites! If whites have ANY kind of fat or yolk in them, they will never. ever. whip into anything you can use. They'll make a great omelet, or scrambled eggs, but that's about it.


Now then, lets turn our attention to the powdered sugar and almond flour. This has to be sifted a couple of times, this is important. The almond flour can still have bits of almonds that weren't ground up finely enough. If you leave these its in, they will show up in your finished macaron, and you'll have a bumpy cookie, not the smooth surface you want. I sifted this three times, and mine turned out great!

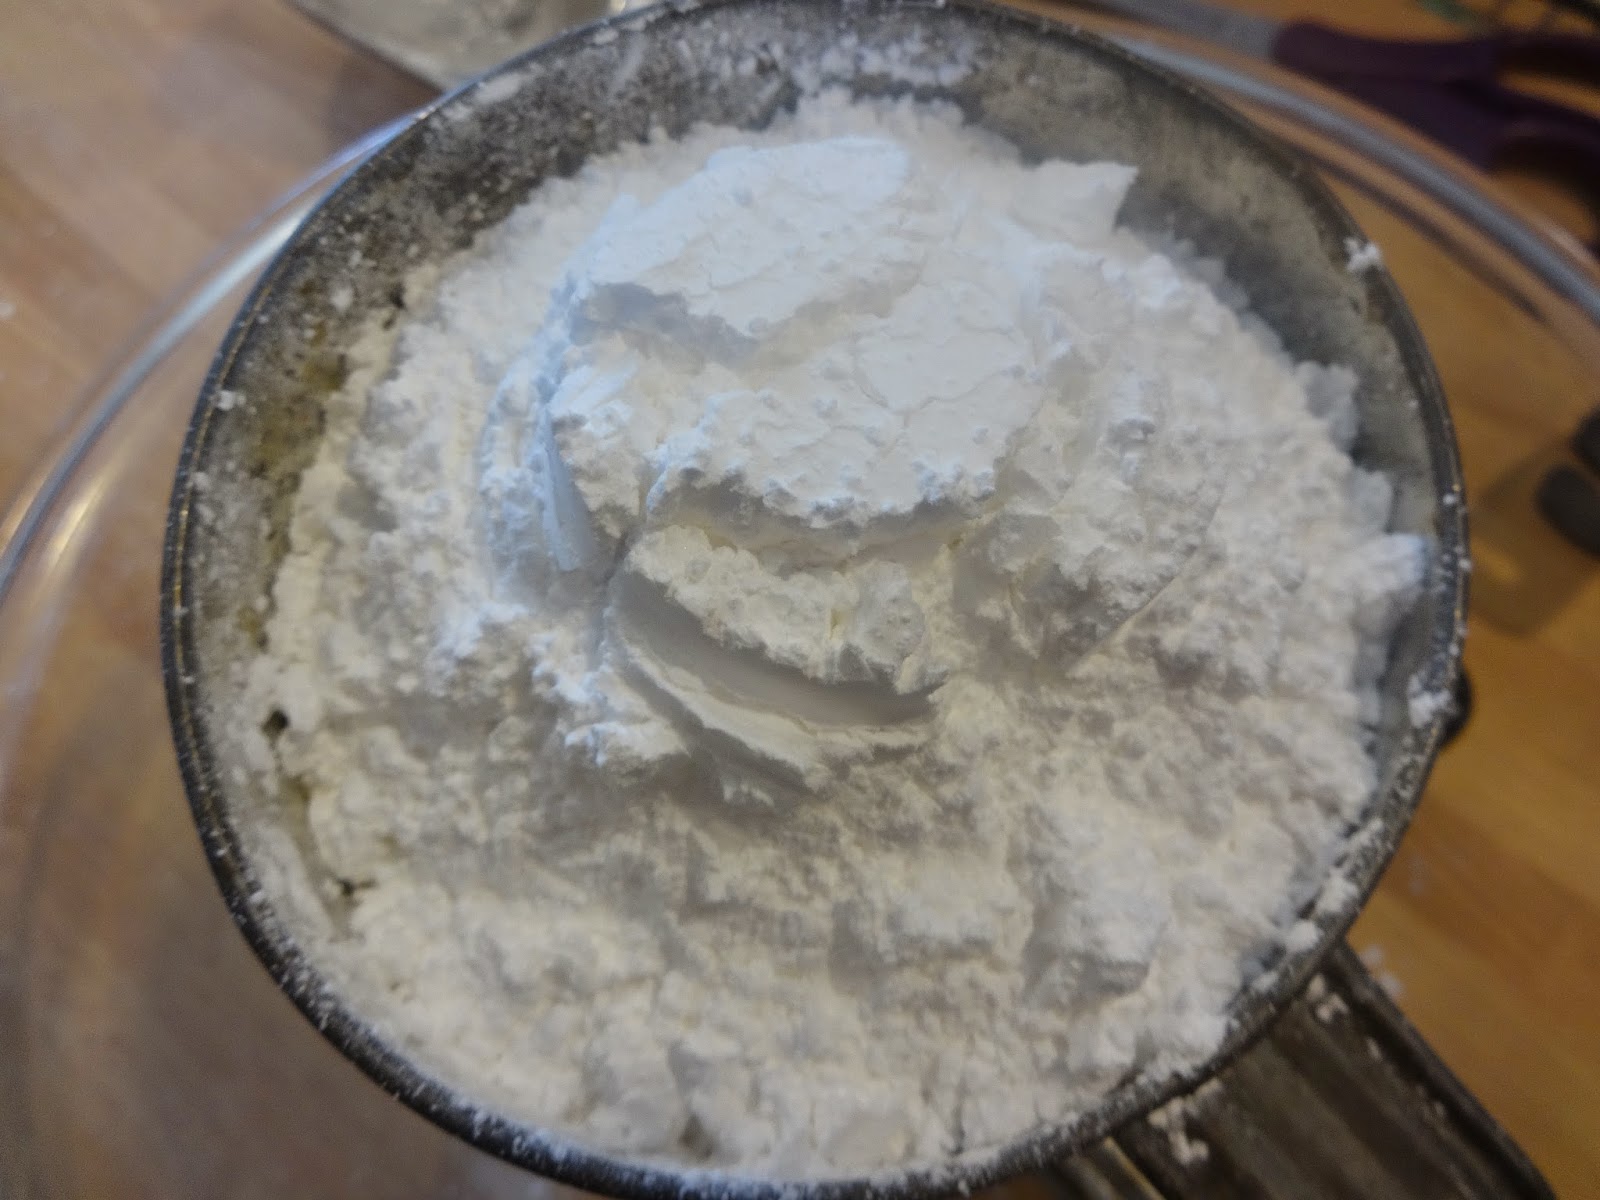


Once your powdered sugar/almond flour has been thoroughly sifted, set it aside, and prep your pastry bag. I just used a zip top bag, with the corner cut off, and a large mouthed piping tip. I set my bag in a large glass, and had it ready to go!


Okie dokie! Put your egg whites in your mixer, and, starting on low, slowly increase the speed until you get soft peaks. Once you get soft peaks, add in about 1/2 tsp of the food coloring powder, and continue to whip until you've reached stiff peaks.


Here are soft peaks, see how the peak flops over? That's not quite it....the next one, the peak stays pointed up! That's what we're looking for!


Just a quick note about food colors. Not all of them are made for baking! The sky blue color is made for icing - if you use it for baking, your baked goods may turn a bit brown. It's okay if it's a cake, and you're going to ice it, but if your baked good is going to be naked, you want it to be the color you wanted. I got mine from here, you want it to be a powder and not a liquid or gel, these can throw off the recipe.


Now then, another important item you're going to need, is a soft spatula. You could probably do these without one, I mean, macarons have been around well before the soft spatula, but they do make it so much easier.
The technique I was talking about earlier, was how you mix the almond flour/powdered sugar mixture in with your egg whites. Your instinct is going to be to do it as gently as possible, so that you don't deflate the whites that you were so careful to whip air into in the first place!
Fight this instinct. You actually do want to deflate your egg whites, and by using the spatula to scrape them against the sides of the bowl as you mix, this gets done pretty quickly. So, dump all of your almond flour/powdered sugar mixture into your egg whites.


At first, it will look like a frumpy mess, but keep mixing/scraping, and it will incorporate nicely. Once it is all mixed up together, you're looking for something the texture of molten lava. As you lift your spatula out to check, you want the mixture to slowly run off, in one smooth flow. It is a little tricky, but easy enough to recognize it when you attain it. If you under mix your batter, your macaron won't turn out right; if you over mix it, your macaron won't turn out right. It is a delicate balance, and this is the only tricky part of making these cookies.


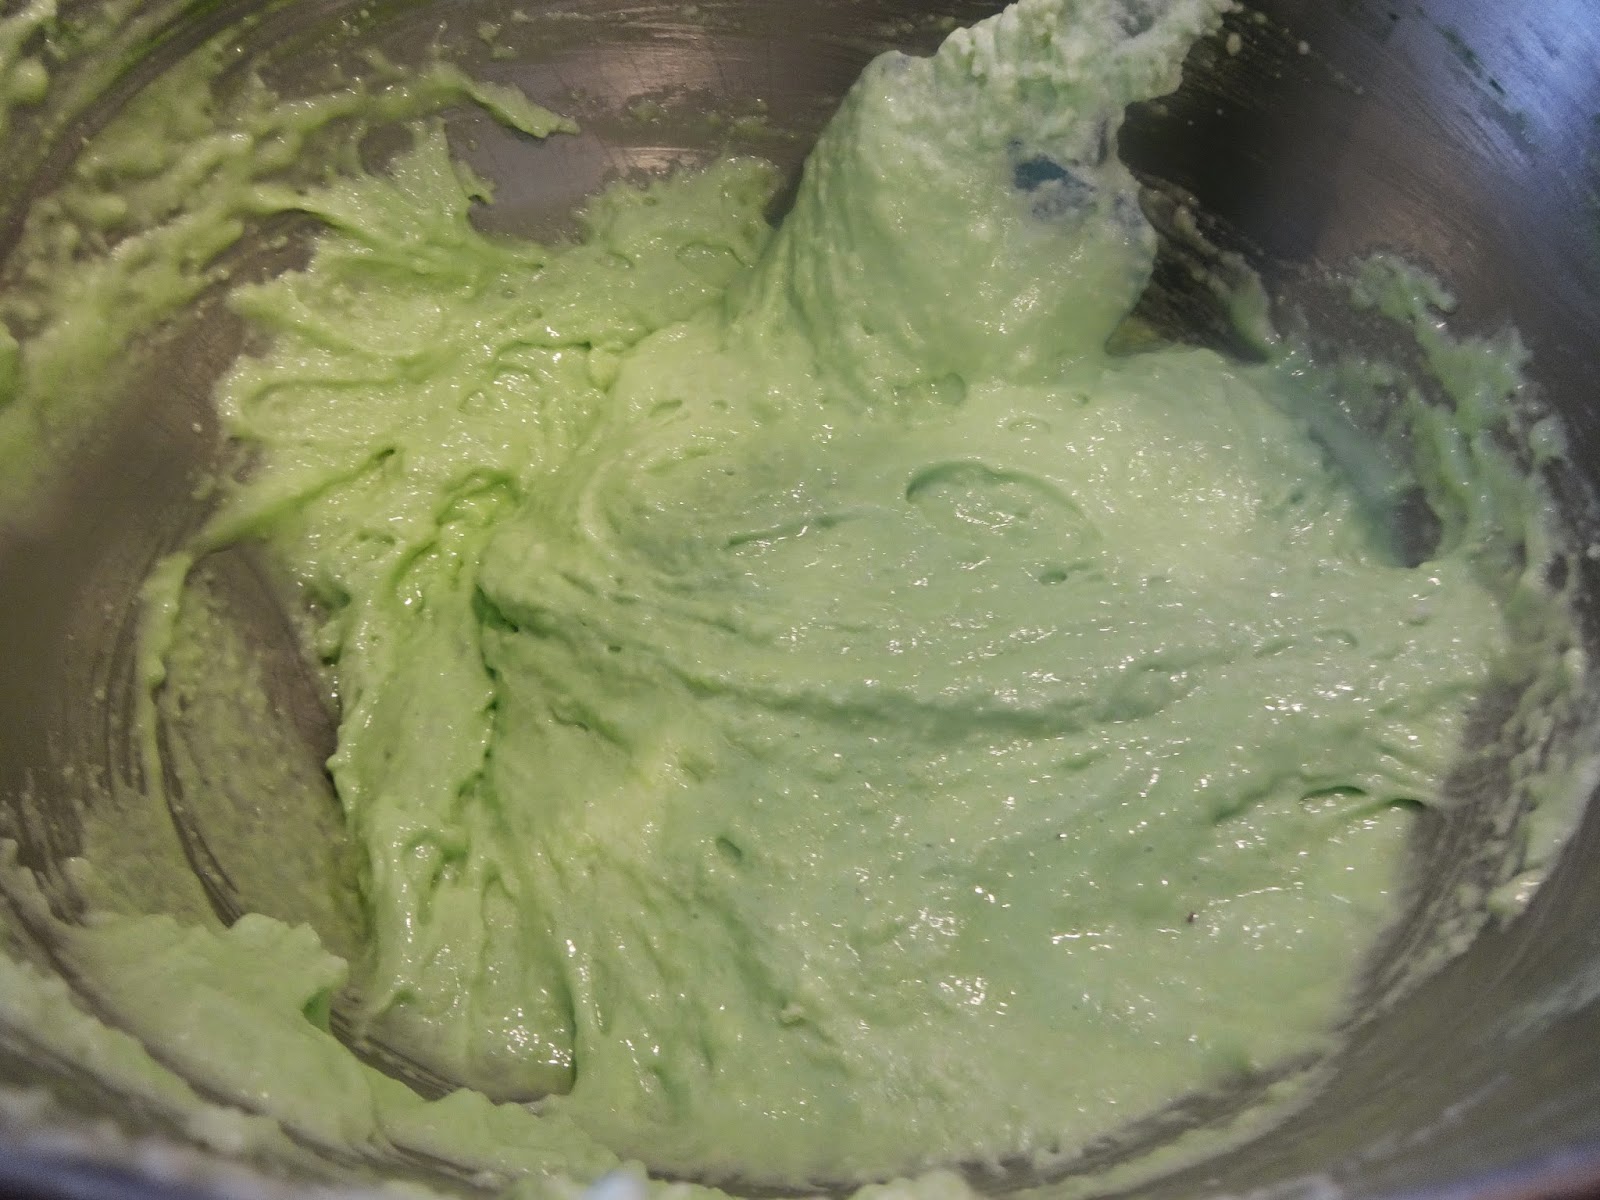

I was trying to take a picture of this, but my camera wasn't working with me, so...this is the best I could capture, but I think you can see what I'm talking about!


Once you have your mixture to the consistency we're looking for, pile it into your piping bag; be careful, this will be a little bit drippy. Now, I'd heard about a special silicone pad made just for baking macarons. These were supposed to make beautiful, perfect macarons, versus using parchment paper on a regular baking sheet. I decided to get one, and try both methods, and see which one worked best. I started off by piping the macarons out on the silicone mat, as you can see. Once you pipe them out, you want to let them rest on the counter, for at least 30 minutes. This will let the macarons spread out a little bit, so when they're in the oven, they only have to puff up, not puff up and out. This allows the feet (the lacy rim around the base of the macarons) to develop easier in the oven, and is the hallmark of a good macaron.


I realized after my macarons rested and spread out, that I piped my macarons too big on the silicone pad, which I didn't like. I piped some out on the parchment paper covered baking sheet, and let them rest and spread as well. I didn't have to worry about them spreading out and touching one another with the parchment paper, because I controlled where I put the cookies, so none of these spread out and started touching.

Now, let me back up a step, and say that after you pipe these cookies out, you'll want to slam the cookie sheets down to release any air bubbles that are trapped under the macarons. You want to do this before they have rested too long, because a skin will form on the macaron as it rests, which is what you want. They will go from being shiny and a little sticky to the touch, or being a little matte and dry to the touch. This is when they are ready to go into the oven!


As they are resting, preheat your oven to 325*, and once they are ready to go, bake them for about 15-20 minutes. Take them out at 15 minutes, and see if you can easily pull one off of the baking sheet. If it cleanly pulls off, they're done! If the top tears off, you'll want to put them back into the oven (don't worry, if it tears off, it will reseal itself in the oven, and you can still use it!)


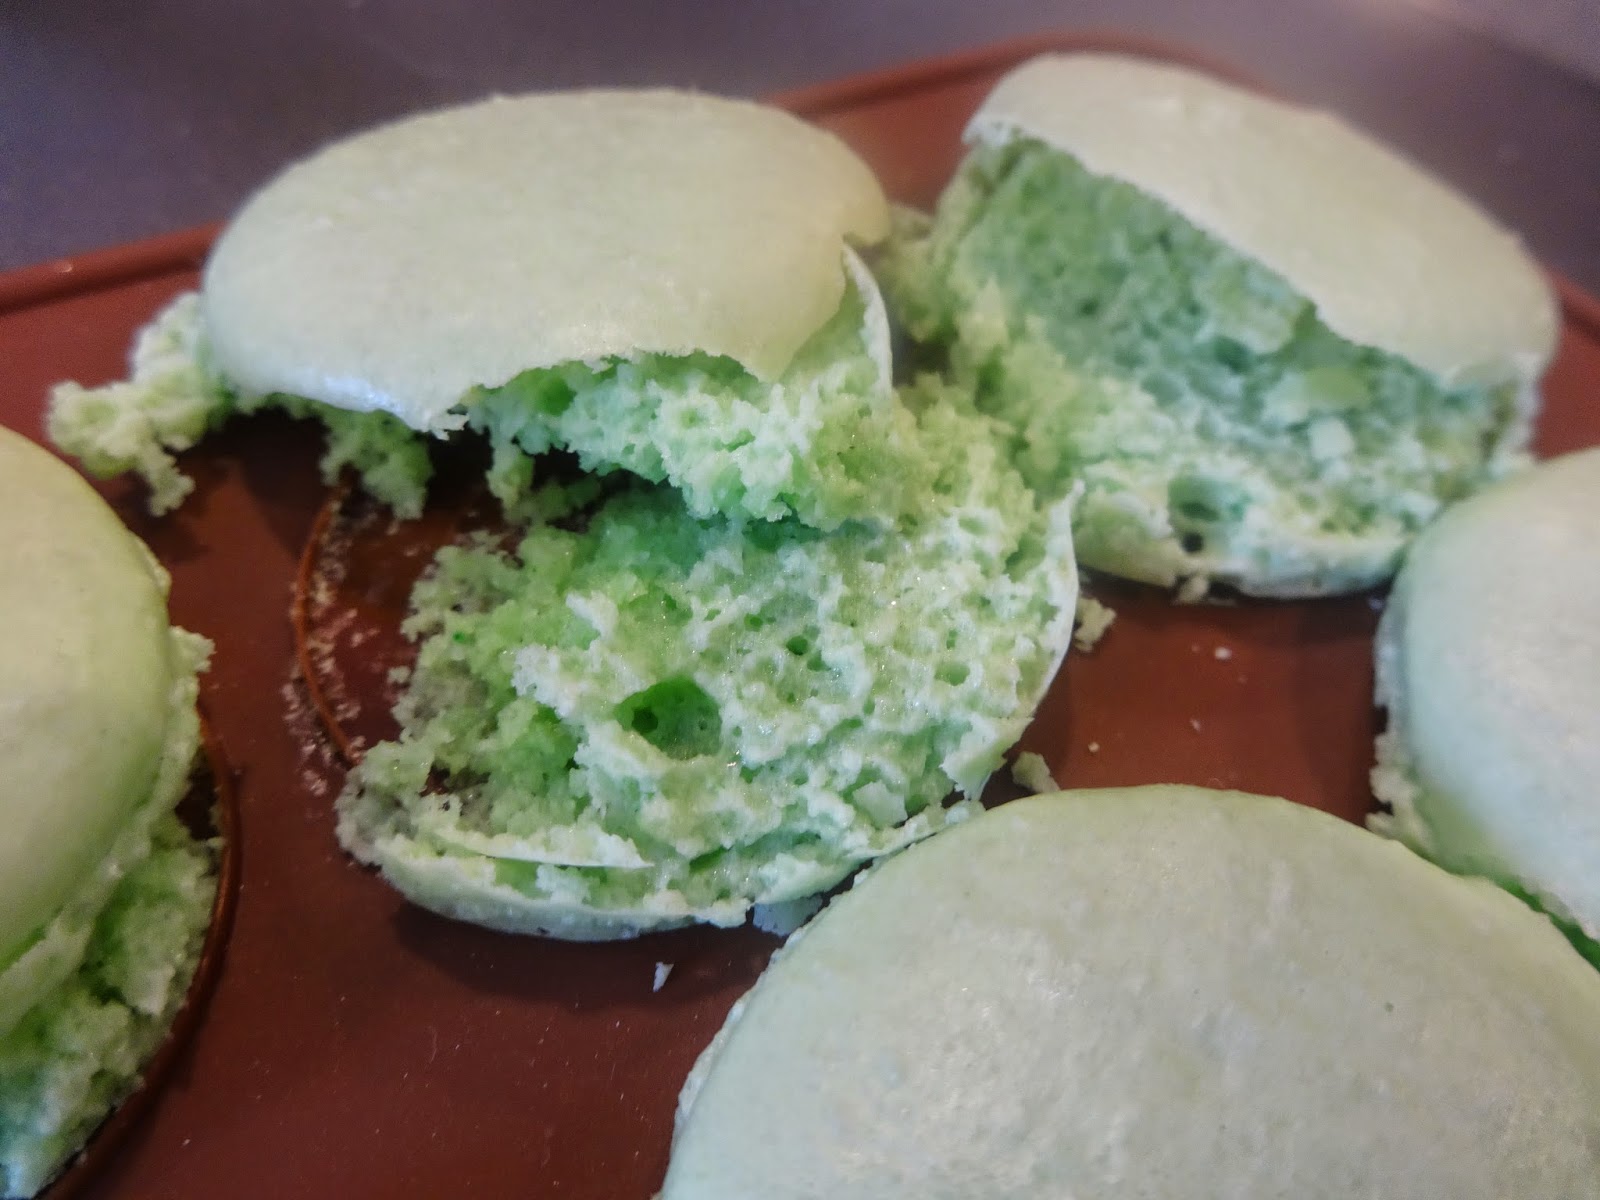
Once they're finished, let them cool on your cookie sheet, then flip half of them over, to get them ready to fill! This is how my macarons baked up on the parchment paper, and on the silicone baking pad. The parchment paper ones were beautiful and perfect! Aaannndddd the silicone baking pad ones just...did not. I never could even get them off of the darn thing, so I just tossed it. It did make me sad, to go through all of that effort, and only get 10 cookies, but, I have learned this lesson for the next time we make them!


Now that that has been established, lets turn our attention to the filling! This is a very simple, straightforward chocolate ganache filling. Simply heat the cream up to just simmering, dump in your chocolate, and stir until fully melted. Let this cool to room temperature, so that it pipes easily onto your cookies. Once it has cooled down, put it into a zip top bag (you don't need to worry about a piping tip, just snip the corner)


Once your cookies have been filled, close up the sandwiches, and try not to eat them all in one sitting! My daughter was so proud of the "smacarons" that she helped bake, that she had to take them in her lunchbox for her school lunches!
During our date that week, she said she preferred the cookies we made at home, and you know what? I did, too.....
During our date that week, she said she preferred the cookies we made at home, and you know what? I did, too.....


No comments:
Post a Comment